Floating vanity bathroom designs have become a go-to for modern remodels, offering minimalist aesthetics and freeing up floor space-but if you want safe, stylish results, there’s more to consider than just a sleek look.
Key Takeaways
- Proper installation with wall studs and approved heavy-duty brackets is crucial for floating vanity bathroom safety and durability.
- Weight limits, structure, and support differ greatly by size and material—never skip reinforcement, especially in renovations.
- Market data and cost comparisons are sparse for 2024, so consult multiple vendors and professionals for up-to-date pricing.
- What is a floating vanity bathroom and why is it so popular?
- Step-by-step floating vanity installation guide
- Advanced analysis & common pitfalls
- Conclusion
- FAQ
What is a floating vanity bathroom and why is it so popular?
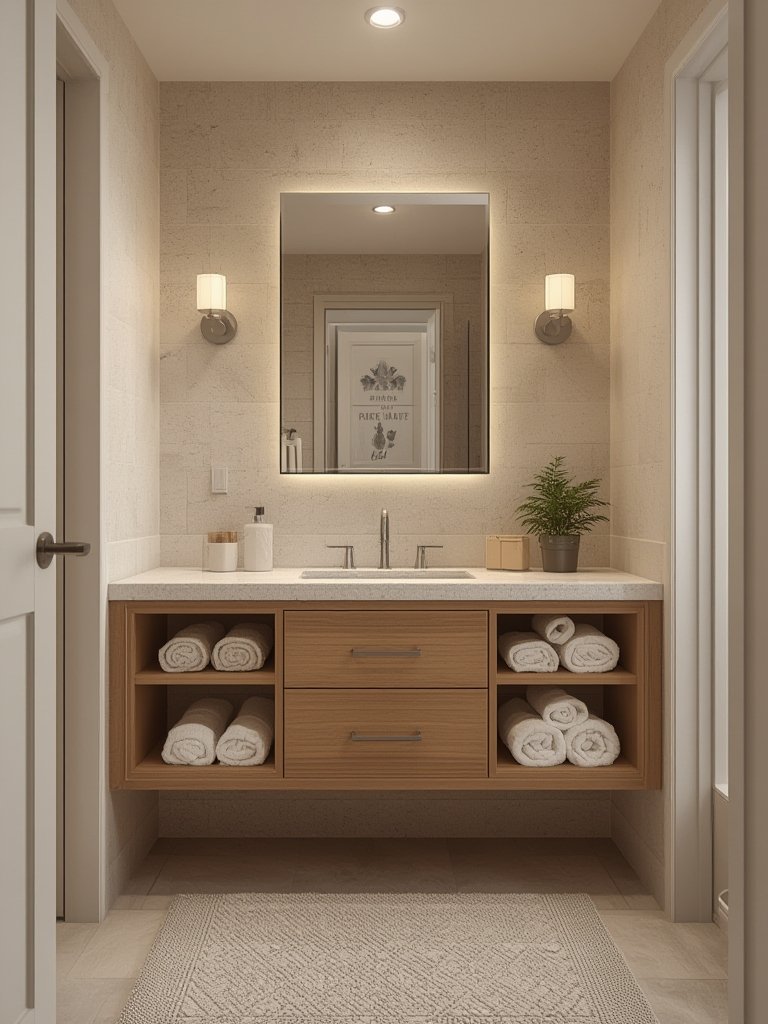
A floating vanity bathroom features a wall-mounted cabinet and countertop that appears to “float” above the floor. This modern approach eliminates the bulky base of traditional vanities, letting the floor beneath show and making even small spaces feel more open. Floating vanities are most popular among those seeking a clean, minimalist look and improved accessibility.

This style’s rise is closely tied to the trend of spa-like bathrooms and the desire to maximize every inch—paralleling other space-saving movements found in wet room bathroom renovations. Floating vanities work in both compact powder rooms and statement master baths, providing flexibility for any layout. The open toe-kick also allows for easier cleaning, wheelchair access, and under-cabinet lighting effects. However, careful planning is non-negotiable for load-bearing safety, especially in older homes or drywall-only partitions.
Step-by-step floating vanity installation guide
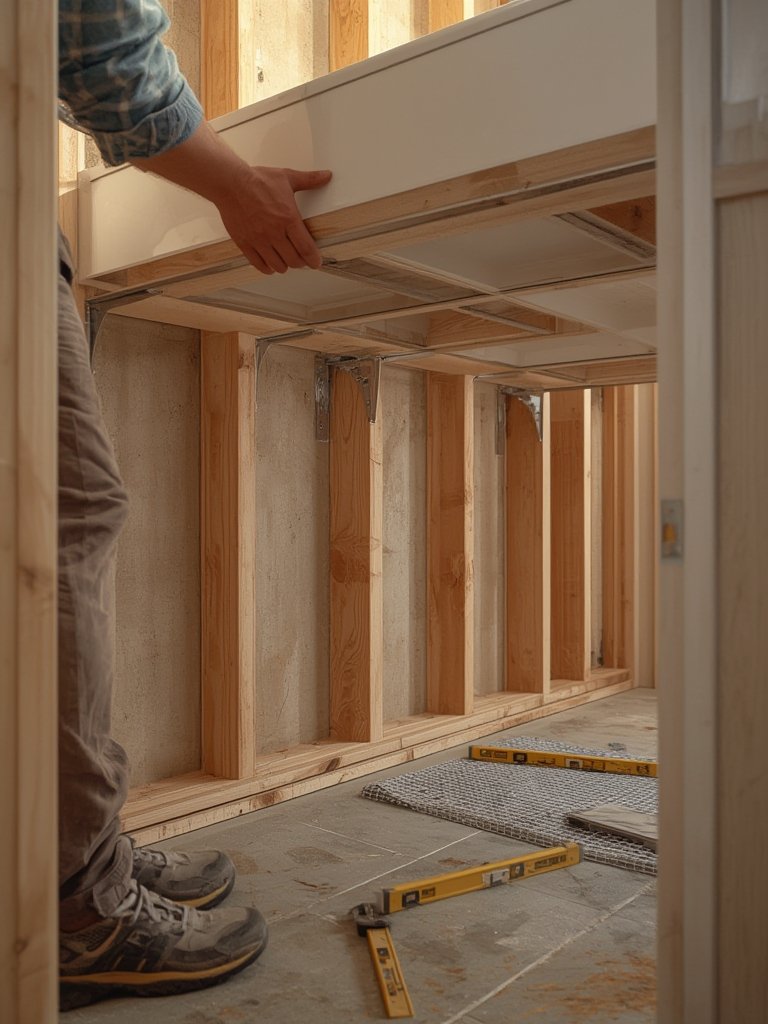
Installing a floating vanity bathroom isn’t just about appearance—it’s about structure and longevity. Here’s how to tackle it safely and efficiently:
- Pro Tip: Always mount your floating vanity into a minimum of two wall studs (three for vanities longer than 48″) and use heavy-duty lag bolts rated for the combined weight of the vanity, countertop, and everyday bathroom items. When unsure, add horizontal wood blocking between studs, especially for stone or concrete tops.
- Hacks & Tricks: Use a folding step ladder like the HBTower Step Ladder to make lifting and aligning the vanity safer and easier—especially on your own.
- Confirm wall structure and reinforcement.
- Use a stud finder to locate wooden wall studs (not just drywall or metal framing).
- If studs don’t match vanity mounting points or you’re renovating, add extra blocking (2×6 wood) between studs at the vanity’s install height.
- Check that wall can hold at least 200-300 lbs. for most sizes-up to 400 lbs. for 72″ and larger vanities (source).
- Mark height, drill pilot holes, and level.
- Standard countertop height: 34–36 inches from finished floor (or 28–34 inches for universal, accessible design).
- Use a laser level or spirit level to mark a straight install line and bracket holes.
- Pre-drill pilot holes directly into wall studs for lag screws or wall anchors.
- Install brackets or mounting cleats.
- Use corrosion-resistant heavy-duty brackets (stainless steel preferred), following manufacturer spacing. Attach top rail or cleats directly into studs or blocking.
- For heavy vanities or stone countertops, double-check bracket weight ratings and reinforce side support if installing wall-to-wall or in a corner.
- Mount the vanity and countertop.
- With 2+ people (or a step ladder), lift the vanity into place and secure it to the brackets/cleats.
- Do not put full weight on the cabinet until all fasteners are installed and checked for movement.
- Install the countertop per manufacturer guidelines, applying silicone sealant for moisture protection.
- Finish plumbing, install sink, and test stability.
- Connect plumbing, faucet, and drain with flexible hoses if possible.
- After full assembly, push down lightly on all edges to check for wobble or flex. Re-tighten anchors if needed before regular use.
If you run into issues like water leaks under the sink, consider protecting your cabinet base with a silicone under sink mat to prevent moisture damage.
For large vanities or heavy countertops (quartz, granite), professional installation is wise. For smaller, modular vanities, skilled DIYers with wall framing experience can achieve great results with careful planning and the right tools.
Advanced analysis & common pitfalls
Even experienced remodelers can make mistakes when tackling floating vanity bathroom projects. Here’s what can go wrong—and how to avoid common headaches:
- Weight overload: Manufacturers rate standard floating vanities at 100–400 lbs (source). Exceeding this (e.g., with a stone top and overloaded drawers) risks brackets pulling from the wall. Always factor in countertop weight and daily storage.
- Improper wall support: Drywall alone cannot support a floating vanity bathroom. Skipping wall blocking or missing studs is the root cause of most post-install failures (like sagging or visible cracks).
- Limited storage: Floating vanities often offer smaller drawers and less cabinet space compared to full-depth floor models. Homeowners may complain about not fitting bulky bathroom supplies or cleaning gear. You can supplement storage with wall-mount shelves or under-sink organizers, or choose models with built-in drawer compartments.
- Installation misalignment: A slanted vanity top or poor sink alignment is usually a result of skipping level checks or not tightening the mounting cleat evenly.
- Maintenance challenges: Dust and hair can collect beneath a floating vanity bathroom. Easy mop access is a benefit, but frequent cleaning is needed-multi-surface steam cleaners like the Nettoyeur vapeur multi-surfaces can help keep exposed floor areas spotless.
| Feature | Floating Vanity Bathroom | Standard Floor Vanity |
|---|---|---|
| Space-saving | Yes. Frees floor, suits small rooms | No. Occupies full footprint |
| Storage | Moderate. Less than floor models | High, especially with full-depth drawers |
| Installation complexity | High. Requires wall reinforcement, correct hardware | Low. Simple floor anchoring |
| Maintenance | Easy to clean under, but needs routine sweeping/mopping | Less exposed floor area, can trap dust at corners |
| Accessibility | Strong, waivable for wheelchair access | Limited, not ADA-friendly unless custom-modified |
Conclusion
A floating vanity bathroom instantly elevates style, maximizes space, and supports modern living. However, achieving safe, long-lasting results depends on meticulous wall assessment, professional installation for large models, and regular cleaning. If you’re ready to give your bathroom a refresh or want guidance on ADA-accessible, clutter-free layouts, a floating vanity bathroom can deliver-just don’t cut corners on the prep work.
Want more space-saving or modern home improvement tips? Read our wet room bathroom guide, or discover tools like the HBTower Step Ladder to simplify future upgrades.
FAQ
How much weight can a floating vanity bathroom support?
Weight limits range from 100–400 lbs, depending on the model and materials. A typical 48-inch floating vanity can hold about 250–275 lbs if anchored into 2–3 wooden studs with heavy-duty brackets. Always account for countertop and storage weight.
Can I install a floating vanity bathroom on drywall alone?
No. Never mount a floating vanity to just drywall. You must anchor into wood studs and, for heavy vanities or stone countertops, add horizontal wood blocking for increased support.
What are the maintenance and cleaning differences vs. a floor vanity?
Floating vanities make mopping and sweeping easier since the floor is exposed. However, they collect dust and hair underneath, so regular cleaning is needed. Periodically inspect mounting hardware for loosening, especially in homes with high humidity.
Are floating vanity bathrooms suitable for tiny bathrooms?
Yes. They visually expand space and improve accessibility in small rooms, but you may trade off some storage compared to a standard vanity. Supplement with wall shelves or organizers if you need extra storage.
Should I DIY or hire a pro for installation?
If your wall is already reinforced and you’re comfortable with tools, skilled DIYers can tackle small floating vanity installs. For vanities 60 inches or larger or when working with heavy countertops, professional installation is highly recommended.